:::: MENU ::::

Best Free Photo and Image Editor

  • GIMPHOTO is FREE OPEN SOURCE

  • GIMPHOTO is STABLE and SOLID

  • GIMPHOTO is PHOTO EDITOR

 
Showing posts with label Manual. Show all posts

If you already make an applications menu for Gimphoto then maybe you also want to make a desktop shortcuts for Gimphoto ala Windows then it is easy to be done using Ubuntu, just follow the steps below:


1. Browse applications menu for Gimphoto, Applications > Graphics > Gimphoto 1.4.3 when cursor mouse highlight the Gimphoto 1.4.3 text menu then do RIGHT-Click. After that will appear a pop-up menu with options to Add This Launcher to Desktop.


2. After select "Add This Launcher to Desktop" then a desktop shortcut for Gimphoto will appear on the desktop.


After installing Gimphoto for Linux, maybe you realize that Gimphoto program installer not automatically creating program menu for Gimphoto. Actually Gimphoto program installer is creating menu but the menu is only available when we login as root. This happen because we must installing Gimphoto as root to be able to install it at /usr/local/gimphoto and appearently Installjammer doesn’t support to create program menu for all users, but only for active user.


So Gimphoto program menu should be created manually and for this example, i will use Ubuntu 8.04 but this steps should be same for all GNOME based Linux distro.


1. Click menu > System > Preferences > Main Menu


2. Click sub-menu where Gimphoto program menu will be located [ Graphics ] and then Click [ + New Item ] to create new menu.


3. Create Launcher dialog will appear, fill Name: Gimphoto 1.4.3 and then Click [ Browse... ] button.


4. Select Gimphoto location: File System > usr > local > gimphoto > gimphoto.sh


5. Then will appear new Gimphoto program menu, Click [ Close ].


6. Access it from menu Applications > Graphics > Gimphoto.1.4.3


using Gimphoto for Windows

There are many great free Photoshop plugins available on the web but for using it we not necessary to have Photoshop installed on our PC. We can use any photo editor that compatible with Photoshop plugins format. GIMP have no support for Photoshop plugins but one great GIMP programmer, Mr. Tor Lillqvist is make GIMP plugin that can use Photoshop plugins, that plugin is called PSPI (Photoshop Plugins Interface).


Actually PSPI only works under Windows because it’s depend on Adobe Photoshop Plugins SDK that only available for Windows. But PSPI also can be run under Linux using Wine. Not all Photoshop plugins format can be used with PSPI, only plugins with extension .8bf that can be use with PSPI and not all .8bf plugins can be used, so we must tested it first before can using it. I will try to review each free Photoshop plugins that useful with PSPI under Gimphoto and their limitations.

PSPI is distributed with Gimpad installer, so if you already download and install Gimpad then PSPI is ready to use on your Gimphoto.

Beside PSPI, Gimpad installer also install one of great free Photoshop plugins that called VirtualPhotographer that is a plugin with many useful filters for photo editing and manipulations. For using PSPI with Gimphoto follow this step below:


1. Install Photoshop Plugins Interface (PSPI)
Download Gimpad installer and it will install Gimpad, PSPI and free VirtualPhotographer plugins.

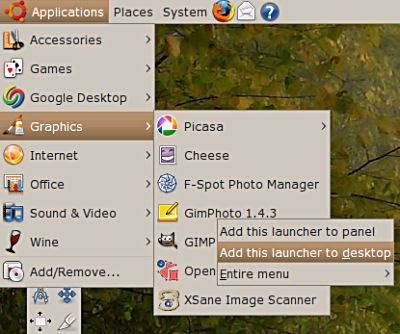
2. PSPI will appear on Image Menu
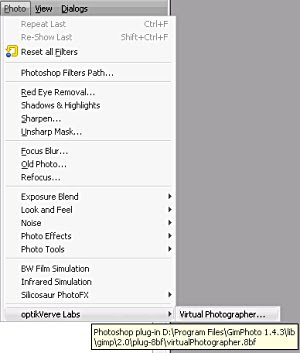
Click Image Menu > Photo > Photoshop Filters Path...


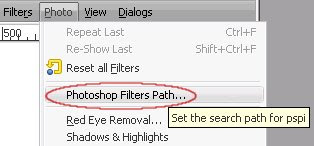
Menu Location for PSPI

3. Set Photoshop Filters Path
After click the Menu then will appear dialog to set the Photoshop Filters Path.
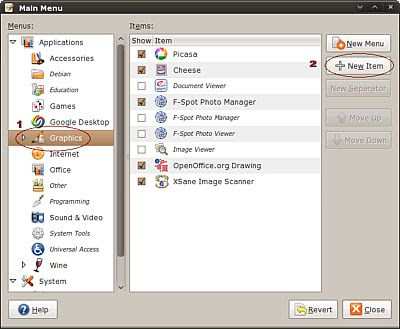
Click on New Icon (1) and then Folder Icon (2) to Browse the directory at your harddrive.
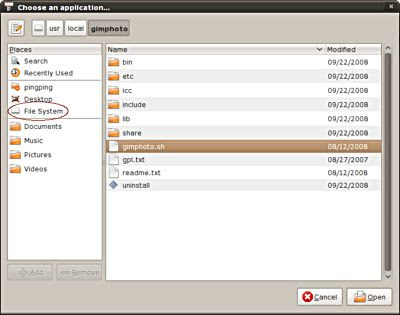
Select Folder where you store your Photoshop plugins, if you install Gimphoto without changing its default folder then select:
C:/Program Files/Gimphoto 1.4.3/lib/gimp/2.0/plug-8bf


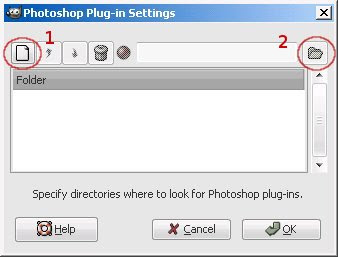
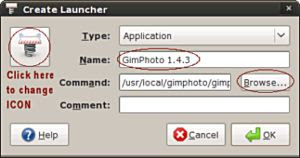
PSPI Dialog Box (1)New Path (2)Browse Folder


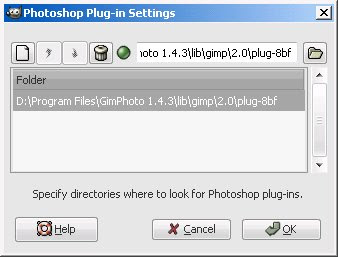
PSPI Dialog showing selected Photoshop Plugins Path

4. Close and Restart Gimphoto
You can also select many different folders for your installed Photoshop plugins that available at your computer harddrive. After selecting the folders location then click OK and close the Gimphoto and restart it so Gimphoto can re-scan all the folder, query all Photoshop that available to be use and create new menu for that plugins at bottom of Photo Menu.


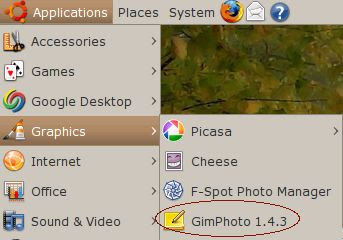
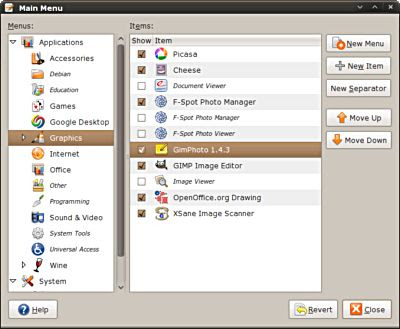
Installed Photoshop Plugins menu location


5. Testing the installed Photoshop plugins
After plugins available under Image Menu > Photo > VirtualPhotographer then we can try by clicking it to make sure that plugins is can be run and and working Ok under PSPI for Gimphoto.


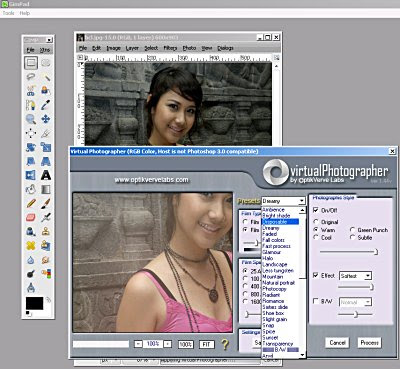
VirtualPhotographer Photoshop Plugins running using PSPI under Gimphoto

TIPS: Try to install plugins one by one then testing it extensively before install another plugins. Beware before using non-tested plugins for professional work because sometimes not compatible plugins can cause computer hang or close application directly, so work safe by save it frequently.

exif-browser

One of Gimphoto user, Pam, has difficulty to preserve exif data using Gimphoto.


EXIF is metadata tags that embedded on photo that taken by digital cameras, it consist of:

  • Date and time information. Digital cameras will record the current date and time and save this in the metadata.

  • Camera settings. This includes static information such as the camera model and make, and information that varies with each image such as orientation, aperture, shutter speed, focal length, metering mode, and ISO speed information.

  • A thumbnail for previewing the picture on the camera’s LCD screen, in file managers, or in photo manipulation software.

  • Descriptions and copyright information.

Actually i didn’t use exif data a lot, sometime i just check the photo’s exif data only to knew about what setting is used to take that photo. Thus i only need photo exif data from original file from camera not from edited photo because that will ruin the original shot results, even if its only scale or crop operation to that photo. Every digital manipulation to the photo will change the quality of photo, for example scale the photo will effect on photo sharpness and crop the photo will make we can’t judge the lens quality anymore from the cropped photo, but that just me :)


GIMP or Gimphoto is always preserve exif data if we use JPG or XCF format.


For other format like TIFF, Targa, GIF, etc there is NO exif data will saved using that format, so be careful if we plan to convert your JPG or XCF format to other file format, maybe better if we backup exif data first before it loss.


This is the workflow if you want to preserve your EXIF data using GIMP or Gimphoto.

  1. Directly from camera or flash, copy JPG that have exif data to your computer folder.

  2. Be careful if you using photo viewer for rotating image, sometimes it delete the exif data.

  3. Edit that photo JPG using Gimphoto (do color correct, sharpening, scaling, add layer, etc)

  4. Save the photo as XCF, this step automatically preserve photo exif data and all layers settings.

  5. Save as the final result as JPG (this step will merge all layers) and still preserve its exif data.

  6. When saving JPG, click Advanced Options > check Save EXIF options then click OK.

  7. Or Export to other file format that will delete exif data but we still have XCF with exif data.

For better management tool with function for backup and restore your photo exif data, you can try to use exiftool, get it from: http://www.sno.phy.queensu.ca/~phil/exiftool/


For viewing exif data using GIMP or Gimphoto, we need EXIF Viewer plugins that we can get it from: GIMP Plugins Repository
EXIF Viewer plugin will be included in the next version of Gimphoto.


For further discussion about it, read Flicker user group talk about GIMP exif data.


for: Gimphoto all version.

For now you can't install Gimphoto with GIMP because Gimphoto still uses the same GIMP preferences file location, this will ruin your GIMP installation. But there is simple trick for you to be able install GIMP and Gimphoto together without ruined it.

This tricks is found by photocomix, this photocomix explaination:

1. Install GIMP (or Gimphoto what is first is not relevant) as usual.
2. Now Create a New User Account..( may be even a bogus account as with no Password ), Log In there in new account and install Gimphoto there...during the install look the option that sound something as
"Who may used this program" there are 2 option, choose the DEFAULT "Shared with Other Account " is the right one, (the other "Only You" is the WRONG option).

That should solve any possibile problem, Gimphoto will be available for all users, no need to login with another account, but will get his own folders.

Thank's a lot, photocomix! (^-^)=b
for: Gimphoto 1.4
(this is obsolete now, use Gimpad 1.1)

Many asking about Always on Top feature for Gimphoto 1.4, i'm sorry there is no manual included with Gimphoto 1.4 about this matter.
Actually i already explained about it at Blender forum at this thread but i still not explained it on this site, because i thought that this feature will obsolete with Gimphoto Desktop that will handle everything for Gimphoto including make sure Always on Top for toolbox and panels, so i'm really sorry. But because long development of next version then i think that maybe Always on Top will benefit whom that still use Gimphoto 1.4 so now i will explain it...

This explaination i copy from Blender forum:

Always on Top feature is called Transient Windows, it's available at GIMP 2.3.19 under Menu Preferences but at GIMP 2.4 it's gone.
I believe it's because that feature is buggy under Win32 (try using it with more than one image opened) so the Gimp 2.4 developer decided to hide it until it fixed. Lately i heard that it already fixed but i don't know it will included with GIMP release or with GTK2 for windows release, must be ask to GIMP for Win32 developer team.

So i search better and stable alternative to replace it, i found Power Menu and included it with Gimphoto 1.4 to replace transient windows function better than nothing.
to use Power Menu:
- run Power Menu from Start > Programs > Gimphoto 1.4
- run Gimphoto 1.4
- at GIMP Toolbox window, klik icon beside title bar window, there is will show additional menu "Always on Top", select it.
- at GIMP Tool Options window, klik icon beside title bar window, there is will show additional menu "Always on Top", select it.
- now GIMP Toolbox and Tool options will always on top.
 

But if you still insist to use Transient Windows feature it still available, but you must set it manually, here the step to enable it:

- search folder Documents and Settings.
- goto folder username.computername, such as: user.winxp
- goto folder .gimp-2.4
- open file gimprc with Notepad.
- search this text and add this bold text.

(toolbox-window-hint keep-above)
(dock-window-hint keep-above)
(transient-docks yes)
(cursor-format bitmap)

- save file gimprc.
- run Gimphoto and voila! Transient Windows is enabled.
Just Taste ItDownload Now